May 12, 2025
Posted by Dean Sher, Refael Angel
What Are Secretless AI Agents?
As AI-native infrastructure becomes the norm, securing access to sensitive credentials like API keys, database URIs, and service tokens has never been more critical. Traditional methods, such as hardcoded secrets or static configuration files, introduce risk, increase complexity, and often violate zero-trust security principles.
Secretless AI Agents, represent a new architecture pattern where no secrets are ever stored at runtime. Instead, the agent authenticates using a trusted identity, such as an AWS IAM, a GitHub JWT and dynamically retrieves secrets from Akeyless when needed.
In practice, this powers secure and scalable deployments like:
- A Python script running on an EC2 instance authenticating with AWS IAM
- A GitHub Actions workflow using a short-lived OIDC JWT to authenticate
- A container in Kubernetes using cloud-native identity from GCP or AWS
No .env files. No long-lived tokens. No credential leakage.
Secrets Done Right in MCP Servers
This example showcases how an MCP server uses Gemini to process user input and return answers directly through the MCP UI prompt. The key highlight here is that the Gemini API key is no longer hardcoded. Instead, it’s securely retrieved at runtime from Akeyless via the Akeyless CLI, demonstrating a fully secretless integration.
What Is an MCP Server?
An MCP server can serve as a natural-language interface powered by Gemini. For example, when a user asks a question like
{ "prompt": "What is the speed of light in a vacuum?" }
The server:
- Receives the input via the MCP UI prompt
- Retrieves the Gemini API key securely at runtime from Akeyless using the Akeyless CLI
- Sends the user’s question to Gemini for processing
- Returns the AI-generated response directly back to the MCP UI
This flow highlights a fully secretless architecture—no hardcoded API keys, just secure, on-demand access to Gemini via Akeyless.
Behind the Scenes: AI-Native Query Servers
Modern AI-native applications often use backend components like MCP servers to process natural language and generate intelligent responses. When powered by Gemini, these servers offer tremendous value—but they also require secure access to sensitive credentials, such as the Gemini API key.
In early prototypes, it’s common to see security risks like:
- Hardcoded API keys in code
- Static tokens that don’t expire
- No visibility into secret usage
- Manual secret rotation that’s often neglected
Secretless AI Agents solve these challenges by securely fetching the Gemini API key from Akeyless at runtime—never storing it in code or config. Access is granted only to verified workloads using cloud-native identity, ensuring a secure and production-ready setup.
Now that we’ve explored the architecture, risks, and key components of LLM-powered systems, let’s see the Secretless AI Agent concept in action.
We’ll walk through a simple implementation of an MCP server that accepts a natural language question from the user (like “What is Zero Trust?”), securely retrieves the Gemini API key from Akeyless at runtime, sends the question to Gemini, and displays the response in the MCP UI—all without ever hardcoding or storing any secrets.
The Wrong Way: Hardcoding Secrets in Your MCP Server
Here’s a real-world example of a lightweight MCP-like server that takes user questions and uses Gemini to generate AI-powered responses. In this early prototype, the Gemini API key is hardcoded directly in the code a common security flaw that Secretless AI Agents are designed to eliminate.

So that the architecture looks like this:
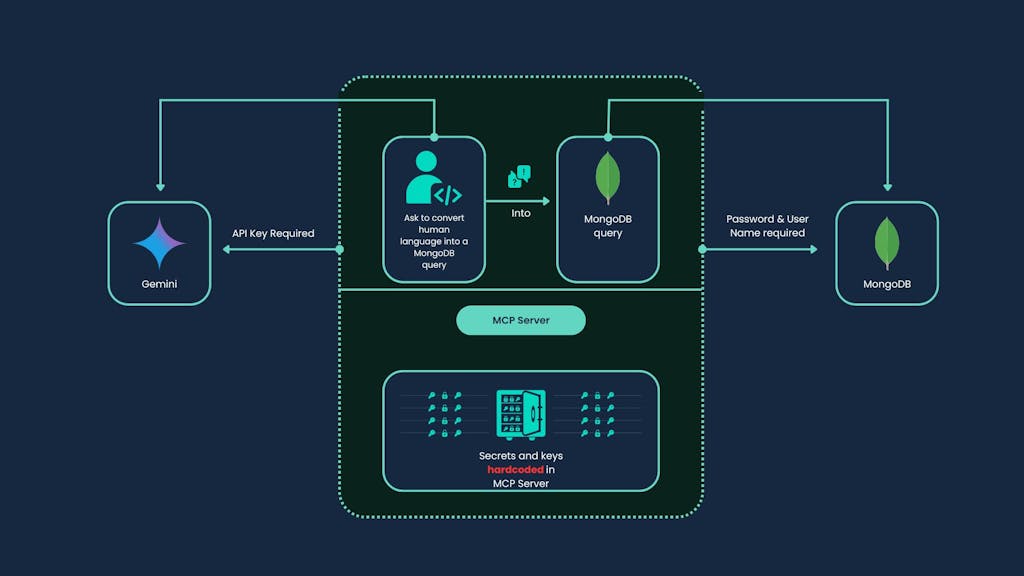
Here are some of the most common issues we’ve seen in this setup:
- Hardcoded credentials: API keys or connection strings embedded directly in the code or environment.
- Static, long-lived secrets: Tokens that never expire and remain active even after deployment or team changes.
- Lack of granular access control: No restrictions on which part of the app can access which secrets.
- No visibility or auditing: It’s unclear when or how a secret was used or by whom.
The Right Way: Secretless AI
This is why Secretless AI Agents are so important. They provide a way to eliminate the need to store any sensitive values in code or pipelines. Using this method, Akeyless becomes the control plane for issuing secrets on demand, scoped by identity and policy.
We don’t expose any secret at the MCP level. Instead, we’ll use AWS IAM or GitHub JWT for authentication.
Choosing GitHub JWT or AWS IAM for Secretless Auth
Whether to choose AWS IAM or GitHub JWT depends on what you are using. Both approaches allow you to:
- Log every request and audit access
- Keep secrets entirely out of repos
- Avoid credential rotation headaches
GitHub JWT Auth
For GitHub use cases, you will (of course) want to use GitHub JWT. In GitHub Actions, every job can request an identity token from GitHub. This JWT can be passed to Akeyless to authenticate without access keys or secrets.
AWS IAM Auth
The AWS IAM auth is ideal for workloads running on:
- EC2, ECS, Lambda
- SSM-authenticated instances
- Anywhere with a valid IAM role
In this case, your instance signs a request using its role and passes it to Akeyless. Akeyless validates the identity, and in return, issues a short-lived session token.
We’ll now go through each auth method step-by-step.
Method 1: Authenticate to Akeyless using GitHub OIDC (JWT)
1. Set up GitHub OIDC Identity in Akeyless
- Go to Akeyless Console.
- Navigate to Identities → Identity Providers → Add Provider.
- Choose
OIDCas the identity type. - Fill in:
- Name:
github-oidc
- Issuer:
https://token.actions.githubusercontent.com
- Audience: (You can set this to your Akeyless Access ID, e.g.,
p-xxxxx)
- Claims Mapping: Leave default or configure to map claims like
repository,actor, etc.
- Name:
2. Create an Akeyless Role for GitHub OIDC
- Go to Access Management → Roles → Create Role.
- Set:
- Name:
github-role - Auth Method: Select your newly created
github-oidcidentity. - Define which secrets this role can access.
3. Configure GitHub Action to Use OIDC Token
jobs:

  build:

    runs-on: ubuntu-latest

    permissions:

      id-token: write

      contents: read

    steps:

      - name: Authenticate with Akeyless

        run: |

          export JWT_TOKEN=$(curl -s -H "Authorization: bearer $ACTIONS_ID_TOKEN_REQUEST_TOKEN" "$ACTIONS_ID_TOKEN_REQUEST_URL" | jq -r .value)

          curl -s https://api.akeyless.io/auth \

            -X POST \

            -H "Content-Type: application/json" \

            -d "{\"access-type\":\"oidc\",\"jwt\":\"$JWT_TOKEN\",\"role\":\"github-role\"}"
Now you have all you need to be authenticated to Akeyless in a seamless, secretless workflow.
Method 2: Authenticate to Akeyless using AWS IAM
1. Create an AWS IAM Identity in Akeyless
- Go to Identities → Identity Providers → Add Provider.
- Choose
AWS IAMas the provider type. - Akeyless will generate an IAM trust policy. Copy this.
2. Create an IAM Role in AWS
- Go to AWS IAM → Create role.
- Select Web Identity → Provider:
Akeyless. - Paste the trust policy provided by Akeyless.
- Give it permissions (e.g., S3 access, or none if it’s just for Akeyless).
- Save the Role ARN.
3. Create an Akeyless Role for IAM
- Go back to Akeyless Console → Roles → Create Role.
- Set:
- Auth Method: Select the AWS IAM provider you added.
- Bound Role ARN: Paste the AWS Role ARN you created.
- Assign permitted secrets or actions.
4. Authenticate from AWS EC2 / Lambda / CLI
Use the Akeyless CLI:
akeyless auth --access-type aws_iamThis uses the EC2/Lambda metadata token from your instance to authenticate securely.
Outcome Example: Secretless Authentication in an MCP Server with Akeyless
This Node.js code demonstrates how to securely retrieve a Gemini API key at runtime using the Akeyless CLI token, without exposing any long-lived secrets in your source code. It leverages Akeyless’s native support for short-lived authentication via OIDC or IAM, and integrates with an MCP server to enable secure prompt handling and LLM access.
import { config } from "dotenv";
config();
import fs from "fs";
import path from "path";
import toml from "toml";
import fetch from "node-fetch";
import { McpServer } from "@modelcontextprotocol/sdk/server/mcp.js";
import { StdioServerTransport } from "@modelcontextprotocol/sdk/server/stdio.js";
import { z } from "zod";
// Akeyless settings
const AKEYLESS_API = "https://api.akeyless.io";
const secretPath = process.env.AKEYLESS_GEMINI_SECRET_PATH; // Set in .env file
let GEMINI_API_KEY = "";
/**
 * Load the latest active token from Akeyless CLI profiles.
 * The token is stored in ~/.akeyless/.tmp_creds and referenced from ~/.akeyless/profiles
 */
function loadTokenFromCli() {
  const profilesDir = path.join(process.env.HOME, ".akeyless/profiles");
  const files = fs.readdirSync(profilesDir).filter(f => f.startsWith("t-") && f.endsWith(".toml"));
  if (files.length === 0) {
    throw new Error("❌ No Akeyless CLI profile files found.");
  }
  for (const file of files) {
    const fullPath = path.join(profilesDir, file);
    const profileData = fs.readFileSync(fullPath, "utf-8");
    const parsed = toml.parse(profileData);
    const sectionEntries = Object.entries(parsed);
    for (const [sectionName, section] of sectionEntries) {
      if (section.creds_file_path && fs.existsSync(section.creds_file_path)) {
        const token = fs.readFileSync(section.creds_file_path, "utf-8").trim();
        console.log("🔐 Using token from:", file);
        return token;
      }
    }
  }
  throw new Error("❌ No valid token found in any profile.");
}
/**
 * Fetch a Gemini API key from Akeyless using the CLI-authenticated token.
 */
async function fetchGeminiApiKey() {
  const token = loadTokenFromCli();
  const res = await fetch(`${AKEYLESS_API}/get-secret-value`, {
    method: "POST",
    headers: { "Content-Type": "application/json" },
    body: JSON.stringify({ names: [secretPath], token }),
  });
  const json = await res.json();
  if (!res.ok || !json[secretPath]) {
    throw new Error(json.error || "❌ Failed to retrieve secret from Akeyless");
  }
  return json[secretPath];
}
// 🌟 Initialize the Gemini key at runtime
try {
  GEMINI_API_KEY = await fetchGeminiApiKey();
} catch (err) {
  process.stderr.write(JSON.stringify({ type: "error", error: err.message }) + "\n");
  process.exit(1);
}
// 🚀 Start MCP server
const server = new McpServer({
  name: "mcp-gemini-chat-secure",
  version: "1.0.0",
});
// Simple test tool
server.tool("sayHello", {}, async () => ({
  content: [{ type: "text", text: "👋 Hello from Gemini MCP (secured with Akeyless CLI auth)!" }],
}));
// Gemini integration tool
server.tool(
  "askGemini",
  {
    input: z.object({ prompt: z.string() }),
  },
  async ({ input }) => {
    try {
      const response = await fetch(
        `https://generativelanguage.googleapis.com/v1beta/models/gemini-1.5-pro-latest:generateContent?key=${GEMINI_API_KEY}`,
        {
          method: "POST",
          headers: { "Content-Type": "application/json" },
          body: JSON.stringify({
            contents: [{ role: "user", parts: [{ text: input.prompt }] }],
          }),
        }
      );
      const data = await response.json();
      const text = data?.candidates?.[0]?.content?.parts?.[0]?.text || "No response from Gemini.";
      return { content: [{ type: "text", text }] };
    } catch (error) {
      return {
        content: [{ type: "text", text: `❌ Gemini error: ${error.message || error}` }],
      };
    }
  }
);
// 🔌 Connect the MCP transport layer
const transport = new StdioServerTransport();
await server.connect(transport);
This simple example of MCP server secretless authentication to Akeyless to retrieve Gemini keys shows how secretless authentication integrates with AI workflows.
Testing the Authenticated Akeyless MCP Server
To test this entire example, all we need is a few simple steps.
1. Install Node.js (v18+)
Make sure Node.js is installed. You can check with:
node -v2. Install dependencies
Run the following in the project folder:
npm install dotenv toml node-fetch zod @modelcontextprotocol/sdk3. Run this code:
npx @modelcontextprotocol/inspector node index.jsOutcome:
If your MCP server is running correctly, this is what you should see:

Outcome Example: Using MCP to Query Gemini
As an example, now you can query Gemini directly from the MCP UI:

You can ask this question directly:
{ "prompt": "What is the speed of light in a vacuum?" } The result will use our script above to return an answer from Gemini.
What The Script Does Behind the Scenes
The script now builds a Model Context Protocol (MCP) server that:
- Loads a Gemini API key from Akeyless, using a token stored by the Akeyless CLI.
- Uses that key to send secure, authenticated requests to the Gemini 1.5 Pro API.
- Exposes tools (
sayHelloandaskGemini) as callable AI tools through the MCP SDK.
This enables modern secretless AI Agents that are designed with security, scalability, and developer simplicity in mind.
The resulting architecture looks like this:

This illustrates that the credentials are no longer in the MCP server and instead are stored in Akeyless. All access is secretless.
Result: Secure, Scalable AI Agents
This walkthrough demonstrates how you can build secure, scalable AI agents that access sensitive services—like the Gemini API—without ever embedding secrets in code, configuration files, or environment variables. By integrating Akeyless with an MCP (Multi-Channel Proxy) server, we’ve enabled a dynamic, agent-based architecture where secrets are pulled Just-in-Time from a centralized repository using short-lived authentication via the CLI. This design minimizes exposure, simplifies credentials management, and aligns with best practices for ephemeral, zero-trust secret delivery.
In short:
- No secrets hardcoded: The Gemini API key is never committed in code or
.env. - No token in env vars: Instead of using
AKEYLESS_ACCESS_KEY, the script leverages an active CLI session (t-*.toml). Keys are retrieved as needed (Just-in-Time). - All keys managed with Akeyless, enabling seamless use of the MCP server.
As AI-driven automation becomes more prevalent, ensuring the integrity and security of the infrastructure behind it is critical. Akeyless provides a robust, cloud-native solution for securing secrets, keys, and certificates without trade-offs in usability or flexibility.
Ready to bring secretless automation to your AI workflows? Explore Akeyless and start building with confidence.